ข่าว: ข่าวประกาศ

  • 04 กรกฎาคม 2024, 12:45:38

เข้าสู่ระบบด้วยชื่อผู้ใช้ รหัสผ่าน และระยะเวลาในเซสชั่น

แสดงกระทู้

This section allows you to view all posts made by this member. Note that you can only see posts made in areas you currently have access to.


Messages - admin

หน้า: 1 ... 97 98 [99] 100 101 ... 115
1471
ถ้าไม่มี Metro LAN ก็คงต้องใช้ Router ละครับ

ถ้า Speed 2M ไม่แนะนำ 2500 นะครับ เพราะว่ามันเก่ามากแล้ว CPU รับโหลดไม่ไหวครับ

แนะนำอย่างต่ำ Cisco 1721  FLASH16 RAM32 

แต่ถ้ายังไม่มี ผมมี Cisco 3640 ว่างอยู่ตัวนึง สนใจติดต่อได้ครับ

FLASH16 RAM64 รับโหลด 2M ได้สบายๆ

1472
ลองใช้เป็นเทคโนโลยี Metro LAN ดูครับ ถ้าใช้ก็สามารถใช้เป็น Switch Layer 3 ได้

ไม่ค่อยแนะนำ Cisco Router เท่าไหร่ เพราะราคาค่อนข้างสูง และออกแบบมาสำหรับ Port Serial รับโหลดได้ไม่เยอะมาก

แต่ถ้าเป็น Switch Layer 3 ออกแบบมาในรูปของ Fast Ethernet และ Gigabit รับโหลดได้เยอะกว่า Cisco Router

ลองเช็คดูนะครับว่า โครงข่าย เค้าเดินให้เป็น Port แบบไหน เป็น Ethernet หรือ เป็น V.35 นะครับ

1473
คุยกับทีมวิจัย / Re: cacti network monitor
« เมื่อ: 14 กรกฎาคม 2008, 21:49:04 »
ผมก็ติดอยู่หลายเดือนเหมือนกัน กะ cacti กว่าจะเจอ

ต้องลบ device เดิมทิ้ง

แล้วสร้างใหม่เป็น ucd/net SNMP Host

ถึงจะสามารถสร้างกราฟ Interface Statistics ได้

1474
คุยกับทีมวิจัย / Re: cacti network monitor
« เมื่อ: 14 กรกฎาคม 2008, 20:53:15 »
ทำตามขั้นตอนในคู่มือหรือเปล่าครับ

ลืมไปว่า วิธี config cacti อยู่ในชุดเต็ม

มีเทคนิคเพิ่มขึ้นนิดหน่อย

 ;D ;D ;D

1475
คุยกับทีมวิจัย / Re: cacti network monitor
« เมื่อ: 14 กรกฎาคม 2008, 20:36:08 »
เมื่อมีการเปลี่ยนแปลง config ของ snmpd.conf

จะต้องทำการ restart service ใหม่

/etc/init.d/snmpd stop
/etc/init.d/snmpd start

แล้วก็ Query ใน cacti ใหม่อีกครั้ง

1476
คุยกับทีมวิจัย / Re: cacti network monitor
« เมื่อ: 14 กรกฎาคม 2008, 20:14:36 »
ลองเพิ่ม

view all    included  .1                               80
view system included  .iso.org.dod.internet.mgmt.mib-2.system

ลงไปดูครับ

1477
Linux Server System / Ubuntu 8.04.1
« เมื่อ: 14 กรกฎาคม 2008, 19:51:23 »
ได้มีการออก Ubuntu 8.04.1 ขึ้นมา

น่าจะเป็น Version ที่มีการแก้บั๊กเล็กน้อยจากตัว 8.04

สามารถ download ได้จาก

http://releases.ubuntu.com/8.04/


1478
คุยกับทีมวิจัย / Re: cacti network monitor
« เมื่อ: 14 กรกฎาคม 2008, 19:27:22 »
ลองตรวจเช็คไฟล์ /etc/snmp/snmpd.conf

น่าจะมีอะไรผิดอยู่

1479
ตอนแรกที่ตั้งใจไว้ เอกสารจะเป็นไฟล์ pdf ไรท์รวมไปกับแผ่น CD

แต่เนื่องจากมีผู้สนใจจำนวนมาก จึงทำให้การจัดส่งแผ่น CD ชุดแรกล้าช้านิดหน่อย

ชุดแรกเริ่มส่งให้ได้วันจันทร์ ตอนบ่าย

ผมจึงมีความคิดเห็นว่า จะจัดส่งชุด Update ตัว WebInterface พร้อมคู่มือที่จัดพิมพ์เป็นรูปเล่มให้อีกครั้งนึง

เนื่องจากมีจำนวนมากพอที่จะจัดทำเป็นรูปเล่มได้ สำหรับชุดแรกนี้ก็จะได้รับเป็นแผ่น CD 2 แผ่น เพื่อทำการติดตั้ง

ให้ใช้งานได้ก่อน

ขอบคุณครับ

1480
Linux Server System / Re: มาศึกษาโปรแกรม Plawan Central Log กัน
« เมื่อ: 14 กรกฎาคม 2008, 07:31:42 »
สำหรับผู้ที่เคยติดตั้ง Plawan แล้วนั้น จะเห็นว่า Plawan จะนำ Ubuntu 8.04 มาพัฒนาเป็นโปรแกรมติดตั้งของตัวเอง

ผมเลยนำวิธีทำแผ่นติดตั้ง หรือ Custom Ubuntu distro มาฝากกัน 
พอดีผมกำลังศึกษานำมาพัฒนาใน version WebInterface

How to create a custom Ubuntu distro

Reff : http://www.theyagar.com/2006/12/31/how-to-create-a-custom-ubuntu-distro/

Posted on 31st December 2006 by Taggy 1

*Get the packaged you need
sudo apt-get install squahfs-tools mkisofs

*Load the squashfs
sudo modproble squashfs

create a iso image of Dapper CD
* confirm that cdrom is not mounted ,if it is then
sudo umount /cdrom

* dd if /dev/hdc of=/pathtoiso/image.iso
else dd if /dev/cdrom of=/pathtoiso/image.iso

* Create a working directory
mkdir ~/custom

* move the iso to custom
mv /pathtoiso/image.iso ~/custom
cd ~/custom

* mount the image.iso
mkdir mnt
sudo mount -o loop image.iso mnt

* get the contents of iso in to a local dir
mkdir extract
rsync –exclude=/casper/filesystem.squashfs -a mnt/ extract

*Mount squashfs
mkdir squahfs
sudo mount -t squashfs -o loop mnt/casper/filesystem.squashfs squashfs
mkdir tmp
sudo cp -r squashfs/* edit

*Mount the root
sudo chroot edit
mount -t proc none /proc
mount -t sysfs none /sys
export HOME=/root

*Customization
Now you have all the settings ready and you can readily customise by apt-get
for eg, to add mplayer
sudo apt-get install mplayer

*The default backgrounds and splashscreens can be simpley copied .

*Edit LiveCD user
sudo vi edit/usr/share/initramfs-tools/scripts/casper-bottom/10adduser
sudo vi edit/usr/share/initramfs-tools/scripts/casper

*Cleanup
rm -rf /tmp/*
umount /proc
umount /sys
exit

chmod +w extraxt/casper/filesystem.manifest
sudo chroot edit dpkg-query -W –showformat=’${Package} ${Version}\n’ > extract/casper/filesystem.manifest
sudo cp extract/casper/filesystem.manifest extract/casper/filesystem.manifest-desktop
sudo sed -ie ‘/ubiquity/d’ extract/casper/filesystem.manifest-desktop
sudo mksquashfs edit extract/casper/filesystem.squashfs
sudo vim extract-cd/README.diskdefines

*Generate new md5sum
sudo -s
rm extract/md5sum.txt
(cd extract && find . -type f -print0 | xargs -0 md5sum > md5sum.txt)
exit

*Create the iso
cd extract
sudo mkisofs -r -V “$IMAGE_NAME” -cache-inodes -J -l -b isolinux/isolinux.bin -c isolinux/boot.cat -no-emul-boot -boot-load-size 4 -boot-info-table -o ../custom.iso .

*You can test the cd by
qemu -cdrom custom.iso -boot d

*Burn the iso using k3b or nautilus-cd-burner
or
cdrecord dev=/dev/hdc custom.iso


เพิ่มเติมสำหรับเวป ubuntu

Reff : https://help.ubuntu.com/community/LiveCDCustomization?action=show&redirect=LiveCDCustomization%2F6.06

Reff : https://help.ubuntu.com/community/InstallCDCustomization

หรือใช้โปรแกรม Reconstructor 2.7 น่าจะง่ายกว่า เป็น Graphic Mode

1481
Serial ให้เก็บไว้ลงทะเบียน update เป็น WebInterface นะครับ

คาดว่าน่าจะใช้เวลาประมาณ 1 เดือนสำหรับทำการ Update ตัว WebInterface และทดสอบพร้อมใช้งาน

ขอบคุณครับ

1482
หลังจากที่ compile kernel แล้ว จำเป็นต้อง compile iptables ใหม่ด้วยครับ

ให้มัน support กับ kernel ใหม่ที่รองรับ layer7

1483
ต้องการแก้ไข File ชื่ออะไรครับ

อย่าลืมว่า Ubuntu จะใช้ User ในการ Remote ไม่สามารถแก้ไขไฟล์ที่เป็นสิทธิของ root ได้นะครับ

1484
ก็คล้ายกันครับ

แต่ของผมจะเข้าใจง่ายกว่า

และไม่มีปัญหากรณี มีการเปลี่ยนแปลง route table เนื่องจาก MARK RULES จะทำการเปลี่ยนแปลง เฉพาะ State NEW

ส่วน State RELATED,ESTABLISHED จะไม่มีการเปลี่ยนแปลง เพื่อป้องกันการหลุดของเกมส์ที่เล่นอยู่ในขณะเส้น เวป มีปัญหา

เป็นต้น

ซึ่งในไฟล์ /etc/init.d/tableroute.sh จะมีบรรทัด

# MARK RULE FOR NEW PACKET
iptables -t mangle -A PREROUTING -i eth0 -m state --state NEW -j MARK_RULES
iptables -t mangle -A PREROUTING -i eth0 -m state --state RELATED,ESTABLISHED -j CONNMARK --restore-mark

เป็นตัวกำหนดเงื่อนไข ก่อนทำการ MARK Packet

1485
ยกตัวอย่างเกมส์ RayCity ที่กำลังนิยมกันอยู่

เราก็สามารถเช็ค IP และ Port ของเกมส์ เพื่อทำการแยกออกเส้น Games ไม่ให้รวมกับเส้น Net เป็นต้น

โดยให้เครื่องลูกเครื่องใดเครื่องนึงเปิดเกมส์นี้ขึ้นมา และทำการเล่นเกมส์ตามปกติ

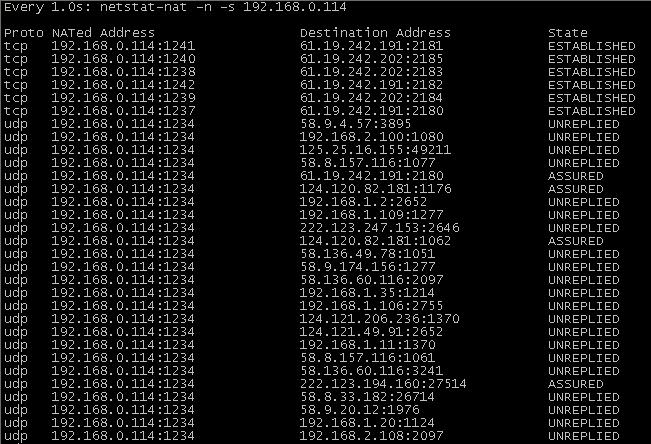
แล้วใช้เครื่องลูกอีกเครื่องนึง ทำการ Remote เข้า Server แล้วใช้คำสั่ง netstat-nat ทำการเช็ค

เช่น เครื่องที่ 14 หมายเลข IP 192.168.0.114 กำลังเล่นเกมส์ RayCity อยู่

เมื่อ Remote เข้า Server แล้ว ก็ทำการเช็ค โดยใช้คำสั่ง  watch -n 1 netstat-nat -n -s 192.168.0.114

จะได้ผลออกมาว่า


จากการตรวจเช็คจากหลาย ๆ เครื่องเราทราบว่าเกมส์ RayCity ใช้ port และ ip อยู่ระหว่างกลุ่มไหน

โดยการตรวจสอบแล้วพบว่า RayCity ใช้

tcp dest ip 61.19.242.0/24 61.19.250.0/24 port 2170 - 2199 อะครับ
udp ยังไม่มีกฎแน่นอนตายตัว ไว้หาเจอแล้วจะแจ้งอีกที

ดังนั้นในการเพิ่มลงไปใน Ubuntu MultiWAN Server จะต้องเพิ่มเข้าไปในไฟล์  /etc/init.d/tableroute.sh

โดยเพิ่มในส่วนของ MARK RULES

# RayCity
iptables -t mangle -A MARK_RULES -d 61.19.242.0/24 -p tcp --dport 2170:2199 -j GAMES
iptables -t mangle -A MARK_RULES -d 61.19.250.0/24 -p tcp --dport 2170:2199 -j GAMES

เป็นต้น

หรือจะทำการ MARK แค่กลุ่ม IP แล้วเปิดไว้ทุก Port ก็ได้เช่นกัน

# RayCity
iptables -t mangle -A MARK_RULES -d 61.19.242.0/24 -j GAMES
iptables -t mangle -A MARK_RULES -d 61.19.250.0/24 -j GAMES

ซึ่งแบบที่สองนี้ แนะนำสำหรับผู้ที่เข้าใจหลักการของ iptables แล้ว

เมื่อทำการเพิ่มเข้าไปเสร็จเรียบร้อยแล้ว ให้ทำการรัน tableroute.sh ใหม่ เพื่อปรับให้ Rules ที่เพิ่มเข้าไปทำงาน

โดยใช้คำสั่ง   /etc/init.d/tableroute.sh

ก็เป็นอันเรียบร้อยครับ

หน้า: 1 ... 97 98 [99] 100 101 ... 115